Radionics Manifestation Part 2
December 02, 2018
Sigils
Sigils are a type of glyph that symbolically represents your statement of intent. They seem to work on a subconscious level, and play on a humans innate ability to recognise shapes, signs and symbols within chaotic systems.
Sigils can work very well on their own, but when added to the manifestation protocol and the instrument set up they work extremely fast. I have had operations manifest within hours rather than weeks using this process.
Reduction
- You will need the statement of intent as described in Radionics Manifestation Part 1, “I have given my car keys to the new owner”. Get a new piece of paper and a good quality pen, black ink will do fine. Capitalise the letters and place them together as showin in Figure 1 below.
- You now need to start reducing the statement. We first begin by removing the Vowels, AEIOU as shown in Figure 2.
- The last stage of reduction is to remove the repeating letters from left to right starting with H. H is repeated once, so remove the single repetition. Complete this task until all repeating letters have been removed. You will end up with something as shown in Figure 3.
Construction
Now we can begin to form the sigil from the reduced statement. People tend to fall into a trap of thinking they haven't done it right, or it doesn't look impressive enough. Any one of any artistic skill set can make a sigil. If you can draw a stick man, you are 90% of the way there already.
I tend to favour constructing my sigils from what I term architectural letters. So letters like a H, Y, I or T from which to work on the rest of the letters.
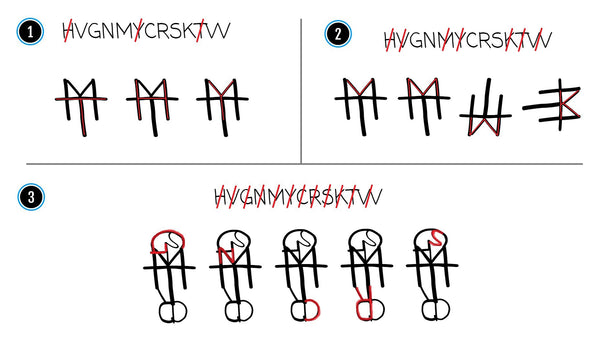
- For this sigil I started with a T, added the H, and Integrated the Y in Figure 1. As you go along it is a good idea to cross out the letters from the reduction to keep track of things.
- Since the form already contains shapes that resemble some more of the letters from our reduction we can cross them off. The letters are V,M,W and K as seen in Figure 2.
- This now leaves us with G, N, C, R, and S that we need to work into the construction at Figure 3.
- The reduction letters are now fully formed into a sigil. You can see from the image below in Figure 3 where the remaining letters were placed. G, R and C could have been formed into one curving structure. However, to add a bit more depth to the sigil I decided to Keep C and R separate for instance as C in reverse helps to disguise the inverse R.
You should now encompass the completed sigil in a circle. Draw around a round object, or use a compass. This serves to complete the sigil and helps to focus your attention on the sigil while tuning the instrument.
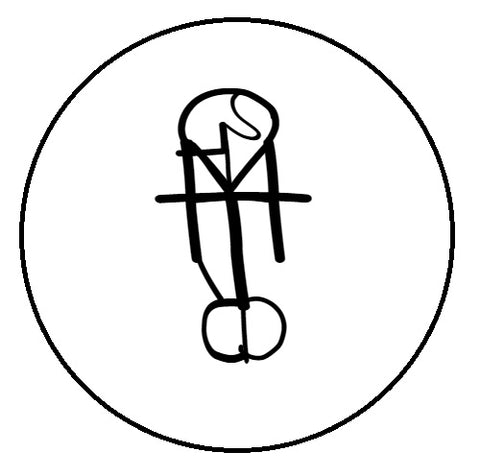
The sigil is complete. However you may wish to include the statement of intent on the back.
Furthermore if your reduction had the letter O, you could include that as the encompassing circle.
Part 1 of Radionics Manifestation Can be found here: Part 1